John Wolff's Web Museum
Notes on Overhauling a Mechanical Calculator
Contents
Overview
Introduction
Many of the enquiries received through this web site are from people
who have recently acquired or inherited a mechanical calculator, and
who are wondering what might be involved in getting it back into
working order. The notes following expand on some of my frequently-given
answers, and are intended to provide some general guidance.
The notes address the sorts of problems that are likely to be
encountered, and outline the general procedures that are involved in
disassembly, cleaning, repairing, and rebuilding. While the tasks
involved can be quite intricate and sometimes rather tedious, they
should not present any major difficulties to a person with a reasonable
amount of mechanical aptitude and some basic workshop facilities.
The notes summarise my own experiences as a hobbyist in overhauling
a significant number of mechanical calculators since the early 1970s. I
make no claims as to the effectiveness or appropriateness of any of the
methods described, and I accept no responsibility for any consequences
arising from their use by others. These methods work well for me, and
have enabled the successful restoration of many of the machines
illustrated elsewhere on this site. If they work for you (and
especially if they don't), or if you know of the original methods, or
methods more suitable for an amateur workshop, I would appreciate
receiving your comments via the
enquiry form.
Summary
It is rare to find anything actually broken in a mechanical
calculator. Most problems in a jammed or malfunctioning machine are
due entirely to the oxidation and decay of the lubricating oil. The
oil dries and hardens with age, causing parts to become slow, sticky,
and eventually immovable. A thorough overhaul will generally involve
completely disassembling the mechanism, cleaning out the oil residues
from pivots, bearings, and moving parts, and reassembling with
new lubricants.
Philosophy
It must be said at the outset that a full overhaul of a mechanical
calculator is not a trivial process. A relatively simple machine will
contain about a thousand manufactured parts, in several hundred
separate components. A fully-automatic machine may contain four or
five times as many. When faced with such complexity, it pays to
remember this simple rule, which was displayed many years ago on
a sign in the old Science Museum in Melbourne:
"A complicated machine is just a collection
of simple machines".
The secret to understanding a complicated machine is to
tackle each of the simple machines separately. In a "calculating"
machine you will always find a setting machine, an actuating machine,
a registering machine, a tens-carry machine, a clearing machine,
sometimes a storage machine or a printing machine. Each of these
machines is built up from even simpler machines - ultimately from just
gears and levers. Try to identify each of the simple machines, examine
their parts, their functions, and their relationships to their
neighbours, and gradually the picture of the machine as a whole
will become clear.
What to overhaul?
If you have just acquired or inherited a mechanical calculator it
might seem as if this decision has already been made. However, it is
strongly recommended that you start your calculator rebuilding
with a basic manually-operated machine such as an Odhner
pinwheel, a hand-cranked Facit, or a key-driven PLUS adder. Consider
buying a cheap "practice" machine from an auction or flea market, and
rebuild it using the
step-by-step procedures on this site.
This will give you experience and confidence with calculator
mechanisms, and will reduce the risk of damage to an advanced machine
or a family heirloom. It would be best to avoid the larger key-driven
machines and printing calculators for your first project, and you
should definitely leave the fully-automatic machines until you have
had plenty of experience.
If you are considering a motor-driven calculator, you will need to
think carefully about the electrical aspects. Some late-model
machines were quite well designed, with all of the electrical items
enclosed in a single well-insulated module. In contrast, most early
machines were designed with little regard for electrical safety, and
will not meet modern safety standards or expectations. Some
machines contain major electrical hazards which can easily
result in death, fire, or serious injury. Unless you are thoroughly
familiar with electrical wiring and safety requirements, or can obtain
help from an experienced person, it is strongly recommended that you
avoid motor-driven machines and keep to the hand-cranked varieties.
There is little point to overhauling your calculator if you are not
going to live to enjoy it.
If you are purchasing a machine to restore, try to find one that is
in good external condition. A machine that still has its original dust
cover has obviously been well looked after, and will generally make an
excellent candidate. A machine that is simply dirty but otherwise
complete will usally clean up well. Unless it is particularly rare, a
machine that has missing keytops, broken handles, and areas of rust or
corrosion is probably best kept for practice, or as a source of spare
parts. You will be investing a lot of time and effort in the mechanism,
and your results will be far more satisfying if you can start with a
machine that has its original finish in good condition.
The problem
Regardless of its external appearance, a mechanical calculator that
has sat un-used for 30 or 40 years will generally not be in good
working order. It may be stiff to operate, or the dials may not return
to zero when cleared. It may be completely jammed - the handle will
not turn, or the motor runs but nothing moves. Perhaps the motor runs
and the machine cycles, but it runs continuously and will not stop.
Perhaps the machine did turn over when you received it, and even added
2 and 2 successfully, but jammed when you tried with bigger numbers.
Many enquirers ask for the location of the "reset" button which will
put things right and allow them to start again.
Unfortunately, there is no such button. Nor is the problem likely to
be in just a single component which can be repaired or adjusted. The
most frequent cause of trouble in a mechanical calculator is distributed
to a greater or lesser extent throughout the entire machine, and
relates to the decay of the lubricating oil.
Oils and greases thicken as the lighter components evaporate,
then gradually decay through oxidation and harden into thick deposits
or glazes. Many greases contain clay-based fillers, which can leave
very hard residues. The problem is worst where the oil is trapped
between adjacent surfaces, such as in bearings and pivots, and where
parts lie against a flat surface. At best, some individual parts may
become sticky and slow to respond, causing some operations to
malfunction. At worst, a majority of the parts will become completely
immovable, and the machine will appear totally jammed. To restore a
machine to good working order, it is necessary to remove these deposits
from all the bearing points, so that the parts can once again move
quickly and freely.
In the days when mechanical calculators were in constant use they
were often covered by maintenance contracts. They were regularly
lubricated on-site by the field technicians, with new oil constantly
replacing the old. The machines were returned periodically to the
dealers' workshops, where it was standard practice to wash out all
the accumulated oil and grease in a warm solvent bath, dry the machines
in warm air, and completely re-lubricate them before return. This
worked well when the oil was still liquid, but washing alone will not
work half a century later when the oil residues have set like rock.
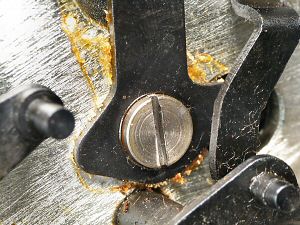
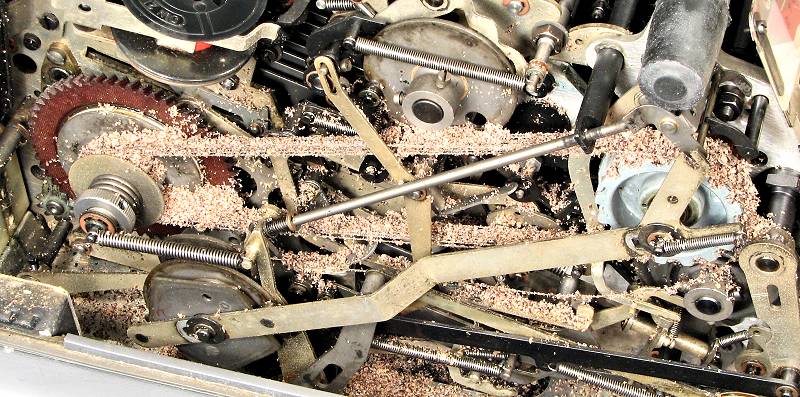
The illustration shows a lever pivoted on a vertical frame in a
Madas calculator. Oil residues have formed a hard yellow deposit
between the two surfaces and stuck them firmly together. Washing in
kerosene has removed the surface oil and turned the residues to a
sticky orange jelly, allowing the lever to be rotated slightly
clockwise. It is clear that the washing has not removed this material
from between the surfaces or inside the pivot, and that the lever is
never going to move freely while the residues remain in place. The
quickest and most effective way to remove these deposits is to
disassemble the components and clean them thoroughly by hand - which
generally means completely disassembling and rebuilding the entire
machine.
Solvents are still required to wash off old oil and grease that is
still liquid, and to loosen stuck parts so that they can be
disassembled. It may even be possible to loosen enough parts to get
the machine "working" after a fashion, but this will never be a full
or permanent cure. The deposits remaining in the bearings will slow
the movements and lead to malfunctions, and the residues will harden
again as the solvent evaporates.
It should be noted that machines that have sat idle for 70 years
or more are generally much less affected by these problems. The
differences are due to the change from natural oils (neatsfoot oil,
whale oil) to automotive-style mineral oils in the 1920s and 30s,
and to "improved" synthetic oils in the 1970s.
Preliminaries
Research
It is advisable to do some homework before starting work on an
actual machine. At the very least, start by reading the
mechanism descriptions on this site, so
that you will have a general idea of calculator technology and the
sorts of mechanisms that you might expect to find. Some of these
descriptions include step-by-step instructions for disassembly and
reassembly. Check online to see if there are service manuals available
for your machine, or search for patent documents at
patents.google.com
to find out how the original designer intended his machine to work.
Time
As a hobby project, a full rebuild of a fairly simple calculator
such as an Odhner or a small Facit will probably occupy all your spare
time for at least a couple of weeks. Allow half a day for disassembly,
another half for washing, and at least a couple of days for cleaning,
checking, and reassembly. A large fully-automatic machine can easily
keep you occupied for several months. There is often a lot of
repetitive work, with identical components repeated 8 or 10 or 20 times
across the columns of the machine. Make sure that you have the time and
the patience to tackle such a project, and that you are not going to
be diverted from it once you begin.
Space
A calculator doubles in size as soon as you remove the cover, and
expands dramatically as the mechanism is disassembled. You will need a
"dirty" workbench of at least a square metre where parts can be
disassembled, washed, and laid out to dry, and a similar "clean" bench
for checking and reassembly. Some of the work may need to be done
outdoors in a garage or shed, but most can be done inside on an
ordinary desk or table. Cover your work area with a large sheet of
white cardboard or cartridge paper (from an art supplies store) so that
parts can be easily located. Do not use newspaper, as it tears easily,
and small parts can be lost against the printing. Keep the work areas
clean and tidy, so that you will have a better chance of finding the
small parts that go missing or end up on the floor.
Tools and equipment
Most service operations on a mechanical calculator can be done
with quite basic tools. You will need a good set of flat-blade
screwdrivers, a small pair of long-nose pliers, and a fine pair of
bent-nose tweezers. A set of dental picks (from a hobby supplies shop)
and a small Exacto knife will be useful for cleaning and scraping.
Some tasks will require a workbench with a solid vice. Further details
and suggestions are given in the sections below. Obviously, the more
tools and equipment you have available, and the more familiar you are
with using them, the easier the tasks will be.
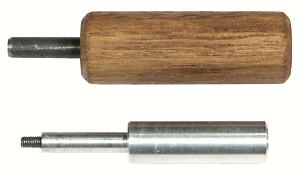
Calculator manufacturers often produced a range of special tools to
speed up operations in the distributors' workshops. The special tools
were often extremely useful, but were generally conveniences rather
than absolute necessities. It is rare to find such tools today - many
exist only as illustrations in the few surviving service manuals. If
you are handy with a lathe or milling machine you will recognise
plenty of tasks which can be simplified by making up a special tool
or fixture. The illustration shows two simple home-made tools that are
very useful in
rebuilding the
Facit C1-13.
Disassembly
Where to start
Until about the 1930s, most calculators (and most other machines,
for that matter) were designed on the "monolithic" principle. They were
assembled piece by piece from the ground up, and generally need to be
disassembled in the same manner. In the absence of any specific
instructions, it is best just to follow Lewis Carroll's profound advice:
"Begin at the beginning, and go on till you come to the end; then
stop". Start at the outside, try to identify the "simple machines" or
logical collections of parts that function (or can be removed) as a
group, and work your way inwards until there is nothing left.
From the 1930s onwards, and particularly during the wartime and
post-war periods, machine design progressed towards a much more
modular and maintainable basis. The fully-automatic
Facit CA2-16 calculator from the
1960s can be disassembled into a dozen functional blocks in a very
short time, and these blocks can then be disassembled piece by piece.
The challenge in getting started is to be able to identify the modules
and how they are attached, which is not always easy while the machine
is fully assembled. In the absence of service instructions or any
obvious clues, it is best to fall back to "begin at the beginning".
Once the machine is apart, by whatever method, you will generally
be able to see a much better way of putting it back together.
Loosening stuck parts
It will often be necessary to use solvents to loosen or "free up"
stuck parts before they can be removed from the machine. Alcohol works
as well or better than hydrocarbon solvents, and the vapours are much
less offensive when working indoors. Apply a liberal coating of
"methylated spirits" or "metho" (an ethanol/methanol blend) to the
affected parts with a brush or long-nosed squeeze bottle. Allow it to
soak in, apply more, then gently push and pull on the parts and attempt
to work them free. Check which way the parts are intended to move, so
as to avoid damage from forcing them backwards. It may take quite a
long time (sometimes days) for the solvent to work its way into pivots
and bearings, but when it does, the parts will come free rather quickly.
Light sewing machine oil can also be used for loosening stuck parts,
but preparations containing unknown additives (3-in-1 oil, WD-40, etc)
are best avoided.
Be very careful with solvents in the vicinity of painted surfaces,
especially painted dials and numeral wheels. Some calculator paints
dissolve in alcohol, some in petroleum solvents, some even in water.
Taking notes
It is vitally important to keep detailed notes during disassembly.
Make a note and sketch of each component as you remove it from the
machine. Record its orientation, mounting point, and engagement with
its neighbours. Use a set of digital calipers to record the dimensions
of screws and especially springs so that they can be returned to their
proper locations. (One popular fully-automatic machine uses more than
40 different sizes of coil springs, which must be returned to
their correct locations).
Note the presence (or absence) of shims, circlips, flat and spring
washers, and other retainers or small parts. Note any differences in
rows of "identical" parts, particularly in the first or last items.
Look carefully for locating or timing marks on gears, cams, and
bearings, and on the adjacent parts or frames. Make a separate list
of any parts which will need special attention. This might include
parts that appear bent or broken, riveted pins that have come loose,
or rubber parts that have decomposed. Record all this information very
carefully, as you will not get the machine back together without it.
There were no digital cameras when I started on this hobby, but I
still use sketches far more than photographs. Sketches make it easier
to focus on the components of interest. They can be immediately
annotated and integrated with the written notes as each part is
removed (even with dirty hands), rather than trying to remember the
purpose of a photograph later. My original notes and sketches for
disassembly of a Facit C1-13 occupied about 8 pages, while those for a
Marchant DRX were about 40. If you have drawings from the patents or
service manuals you may be able to save some sketching, but you should
still keep your own detailed notes and cross-reference them to
the annotated drawings.
Packing and storing
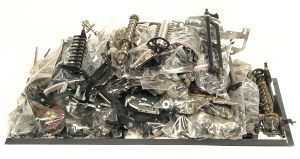
As you remove and sketch each part, place it aside in a small dish
or tray. Keep the dish well away from the machine, in case you knock it
over and spill the small parts. As you come to the end of each logical
grouping, empty the dish into a zip-lock plastic bag, number the bag,
and record the number in your notes. Keep the groups fairly small to
simplify finding the parts on reassembly. Bags of 90x150mm are a
convenient size, and are readily available for a couple of dollars
per hundred. Pack the completed bags and larger components onto a
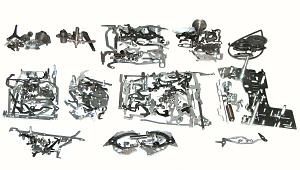
suitable tray and put them aside until ready for cleaning. The
illustration shows most of the components from the body of a Madas BTG,
bagged and ready to go outside for washing. The parts tray is already
twice as big as the original machine, and there is still another
large box storing the case, carriage, keyboard, and motor.
For smaller machines it is also practical (and quicker) to use a
collection of small trays rather than bags to hold the groups of parts.
A plentiful supply of trays (about 80x80x20mm) can be cut from
recycled butter or margarine containers.
Fastenings
Screws. Cheap screwdrivers tend to have thick blades,
which will not fit in the narrow slots in most calculator screws. Some
small screws have slots so narrow that even quality screwdrivers will
not fit. Sometimes it may be necessary to grind the blade of the
screwdriver, or to carefully widen the slot with a jeweller's saw or
a fine (0.5mm) burr in a Dremel tool. Jewellers screwdrivers are
sometimes needed for very small screws. Wear safety glasses when
dealing with tight screws, and be prepared for breakages.
Circlips. Most machines used open-ended circlips, which
are removed by pressing a thin screwdriver blade across the open end
and into the groove. Always place a finger over the clip when removing
or replacing to prevent it flying off. A few machines used ring-ended
clips, which require special circlip pliers to fit. Late-model Friden
machines used plastic circlips, colour-coded according to size. You may
also find parts retained by close-fitting rings of stiff spring wire.
These can be levered out of their groove with a fine jeweller's
screwdriver.
Springs. There is a good reason why these components
are called "springs", because that is precisely what they will do when
you least expect it. Keep them well under control, as small springs
can be very difficult to replace if they become lost. Small tension
springs are best installed with a "spring hook", which is easily made
by forming a small hook into the end of any suitable piece of fine
wire. Catch the loop of the spring with the hook and draw it into
position, then help it onto its pin with a suitable tool.
Tapered pins. Tapered pins are generally the only
components in a mechanical calculator which require workshop facilities
for disassembly. They are used to attach gears, flanges, or lever arms
onto shafts in a fixed alignment. The parts are assembled in the
required positions, a hole is drilled through and reamed to a 1:48
taper (1:50 metric, or about 1°), then a matching pin is inserted
and driven home. The pins can be very difficult to remove, especially
if they have not been touched for 40 years.
The first step is to identify the large and small ends. This is not
always easy, especially if the pin has been removed and replaced a
couple of times before. If you are lucky, the large end will be marked
with a dot punched into the adjacent hub or gear. If not, you will need
to examine both ends carefully to decide which is the larger. If the
pin has been damaged or distorted by previous removals, it may help to
file the ends flat, or even level with the hub, in order to see the
actual diameter.
Next, it is absolutely necessary to provide a firm and
massive support directly under the hub of the gear or flange.
Take a piece of flat steel bar about 50mm wide and 3 or 4mm thick, and
of a length that will stand upright in a large vice. The bottom end
should rest on the throat of the vice, and the top should be about
50mm above the jaws. Clamp this plate firmly in the vice. File a
half-round groove in the top, of a suitable size to support the hub of
the gear, and file or cut a slot below to receive the pin.
Next, obtain a selection of pin punches and carpenter's nail punches
of suitable sizes. The nail punches have a concave end, which will sit
over the pin and reduce the chance of slipping off. Have an assistant
support the hub of the gear in the groove, with the small end of the
pin upwards. Place the punch in position, and hold firmly. For a
typical gear pin of about 3mm diameter it will be necessary to strike a
solid blow with a heavy hammer. A 3-pound bricklayer's hammer (about
1.5kg) is quite effective. Use less force on smaller pins, but don't
be over-cautious. If the first impact fails to loosen the pin, it will
simply rivet the thin end and make it even more difficult to remove.
Drive out the pin with a smaller parallel punch once it is loose, and
tidy up the pin and hub if necessary. It may be necessary to grind down
a punch for small pins. After you have removed the pin and confirmed
which is the large end, punch a dot next to the large hole to assist
with future maintenance. Reassemble in the same manner, but with
rather less force.
Parallel and serrated pins. Two other styles of pins are
sometimes encountered. Parallel or rolled pins are made from a hollow
C-section cylinder of spring steel, while serrated pins are made from
a piece of solid rod with a splined or roughened surface. Both types
should be supported as described above and driven out with a suitable
parallel punch. They generally require much less force than tapered
pins. Before removing these pins, scribe an alignment mark on the ends
of the shaft and hub to assist in reassembly. (The components held by
parallel pins are often symmetrical, but the pin holes themselves
may be slightly off-centre. Reassembly can be difficult if the
alignment is reversed).
Cleaning and checking
Washing the mechanical parts
The first stage of cleaning is to wash all of the mechanical parts
in solvent to remove any loose surface oil and grease. This is followed
by detailed cleaning, careful inspection, and any repairs that might
be necessary.
The traditional solvents used when machines were returned to the
dealers' workshops for service were based either on hydrocarbons
(kerosene or Shellite) or ammonia. More modern techniques include
water-soluble hydrocarbon de-greasers, ammonia-based "clock cleaning
solutions", and ultrasonic cleaners. These methods are described
further below. You choice will depend on the initial state of your
machine, the facilities you have available, and whether this is your
only machine or the first of many.
Attention must always be given to the health and safety aspects when
using any type of solvent. Download and read the "Material Safety Data
Sheets" (or your local equivalent) for the materials in question, and
take note of their recommendations. Be aware that any solvent that
removes oil from your calculator will also remove natural oil from your
skin, and may cause serious irritation. Care must be taken when using
solvents near plastic or painted surfaces, especially painted dials and
numeral wheels. Some calculator paints dissolve in alcohol, some in
petroleum solvents, some even in water. Always proceed with caution.
- Washing in kerosene.
In many cases a thorough scrub in kerosene will be sufficient for
both initial and detailed cleaning. Unfortunately, working with
kerosene is a messy and smelly process which needs to be done outside,
or in a garage or shed with plenty of ventilation.
First obtain a large plastic dish, preferably rectangular, and at
least 300mm long. A plastic or metal tray of the type used with paint
rollers is also suitable, and includes a built-in draining board.
Collect up a good assortment of brushes - a stiff kitchen dish brush,
a hard toothbrush, a soft 25mm paint brush, and a packet of pipe
cleaners for the holes. Brushing produces a fine mist of kerosene
vapour, so wear old clothes or overalls, use safety glasses or a
visor to keep splashes out of your eyes, and set up an electric fan
to blow fresh air to where you are breathing. Prop up one end of the
dish, and pour in enough kerosene to come halfway up the base.
Empty the first bag of parts into the dish and scrub them clean. Use
a small knife or dental pick to loosen any hard deposits. Rinse the
parts in another (smaller) dish of clean kerosene, wipe off the excess,
and lay them out to dry on a large sheet of white cartridge paper. Make
sure that the paper is securely held down, so that it cannot be upset
by the fan or an unexpected gust of wind. Keep each batch together as
a group, and write the bag number on the paper. As you finish each
batch, check carefully that there are no small parts left behind in
the dish or stuck between the bristles of the brush. The illustration
shows several groups of parts from an automatic Facit machine laid
out to dry. (The central groups are much larger than I would recommend
for your first project).
When you have finished washing, close the door and leave the parts
to dry naturally. It usually takes several days for the kerosene smell
to disappear. When the parts are thoroughly dry, put each group back
into a new clean bag and label it with the batch number.
If you wish to recycle the kerosene, empty it into a suitable
container, label it clearly, and put it aside until the dirt settles.
Then pour off the liquid into a clean container and use it again.
- De-greasing solution
It is now possible to obtain hydrocarbon de-greasing liquids which
are soluble in water, similar to the "soluble oil" used by machinists.
Water-soluble de-greasers are readily available in domestic quantities
from automotive supply shops. They are much less offensive to use than
kerosene, and are ideal for preliminary cleaning. The scrubbing can be
done indoors in the same manner as described above, but using only a
minimal amount of liquid. The washed parts are rinsed off in hot water,
wiped down, and dried thoroughly to avoid rust. In some cases this
cleaning may be sufficient, although it generally leaves a slight
petrochemical residue. Used liquid should be mixed well with water
and flushed away. Be careful not to get water into the liquid that
you are using.
- Ammonia and "clock cleaning solution"
Ammonia was another solvent used regularly by calculator workshops,
and is the main ingredient of many of the traditional cleaning
solutions used by clockmakers. Other ingredients include oleic acid
(to brighten brass), acetone (to get the oleic acid into solution), and
some sort of surfactant or detergent. There are many different recipes
available online, and much discussion of their merits in clockmaking
forums. For domestic use we can ignore the oleic acid and acetone, and
make a very workable cleaning solution from household ammonia and
dishwashing detergent.
Clock cleaning solutions usually contain about 1 to 1.5% ammonia.
Domestic "cloudy ammonia" (from the laundry department at the
supermarket) usually contains about 2% ammonia, so it should be diluted
with about half its volume of water. Then add 25ml of concentrated
dishwashing detergent per litre and mix well. The quantities are not
critical. Parts can safely be left soaking for several days at room
temperature until they come clean, or the process can be done in ten
minutes by warming the solution to 40 or 50°C and scrubbing
manually. Washed parts should be rinsed in hot water and dried
thoroughly to avoid rust. The bulk solution can be stored and reused
many times, and can be flushed away when it becomes too filthy or no
longer smells of ammonia.
Ammonia has a distinctive pungent odour which can cause problems in
high concentrations, but the smell dissipates quickly if used in a
well-ventilated area. Ammonia will also dry out your skin, discolour
plastic keytops, and remove the paint from numeral wheels, so proceed
with caution.
- Using an ultrasonic cleaner
Ultrasonic cleaners are very useful aids to cleaning, but they are
not magic. A minimal device for use with calculator parts should have
a tank capacity of about 3 litres, a temperature-controlled heater,
and a timer settable in minutes rather than seconds. Such
semi-industrial devices are now readily available at reasonable cost,
and are a worthwhile investment if you have plans for more than a
single calculator. The small domestic ultrasonic machines sold as
"jewellery cleaners" are not suitable.
The success of ultrasonic cleaning depends to a great extent on the
liquid used in the tank. Flammable solvents should not be used. Clock
cleaning solution works well, and lasts longer if parts are degreased
first. Plain water, either alone or with detergent, is generally not
sufficient.
- Best practice for washing
Washing in kerosene works well if you have a space where it can be
done safely. Kerosene is flammable, but it avoids any problems with
trapped water or rust. De-greasers and clock cleaning solutions work
well and can be used indoors (laundry, not loungeroom), but parts must
be dried quickly and thoroughly to avoid rust. De-greased parts
generally need further cleaning to remove residues. An ultrasonic
cleaner is definitely worthwhile if you have sufficient work for it.
My current practice is to give most parts a preliminary scrub in a
water-soluble degreaser and a rinse in hot water. For metal parts, this
is followed by 5 or 10 minutes in home-made clock cleaning solution in
an ultrasonic tank at 50°C. The parts are then given a final rinse
in hot water, wiped dry, and laid out to dry thoroughly (sometimes on a
tray in a warm oven). The pre-wash is not strictly necessary, but it
helps to prolong the life of the main clock cleaning solution by
avoiding gross contamination. The ultrasonic tank is not necessary, but
helps to keep the cleaning solution at working temperature and avoids
most of the need for manual scrubbing. The various cleaning stages can
be "pipelined" easily so that small batches of parts can be processed
on a 5 or 10-minute cycle.
Detailed cleaning and checking
After the parts have been washed and dried, they need to be cleaned
of all remaining deposits, and checked for any signs of wear or damage.
This is best done as each batch is prepared for reassembly.

Oil residues. Take each part and examine it carefully
for any traces of residual oil deposits. Oil residues may appear as a
clear waxy film, a sticky white or yellow powder, a red or green glaze,
or a thick black crust. Scrape these away with a fine knife or dental
pick, brush them off with a hard toothbrush, and wipe clean with metho
on a rag, cotton bud, or pipe cleaner. You will be amazed at how much
dirt remains after your careful washing.
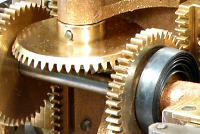
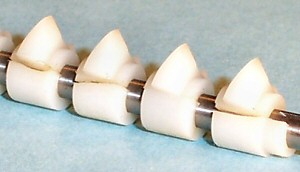
As an example, this close-up illustration shows the radial grooves
in a newly-washed pinwheel from a Facit calculator. Note the green
glaze that has formed on the sides and bottoms of the grooves, where
impurities in the oil have reacted with the brass. There will be
similar deposits on the adjacent pins and setting rings. The glaze is
usually very hard, and makes quite a distinctive sound as it is
scraped away. Be careful not to damage the sides of the grooves.
Some metal surfaces will be blackened or otherwise discoloured
as a result of a chemical reaction with impurities in the oil. This
discolouration will generally remain after the residues have been
removed.
Bearings and pivots. Pay careful attention to all bearing
and pivot surfaces, especially the inner surfaces. Loosen deposits in
holes with a (hand-held) drill bit of the correct size, then wipe clean
with metho on a cotton bud or pipe cleaner. It may take a long time to
clean out a whole set of star wheels. Polish all pivot points with the
finest emery cloth available (at least #1200, preferably 2000 or 3000)
and check that the parts fit and turn freely.
Shafts, flanges, and pins. Check shafts for burrs and
nicks, especially at the ends and in the vicinity of holes. Touch
up with a fine file and polish with emery cloth. Touch up the pins and
flanges as necessary. Check that the shafts fit easily into their
bearings, bearings into their housings, and that moving parts slide
freely along the shafts.
Levers and springs. Remove any burrs that have formed on
levers at their at contact points, and remove any rough spots from
sliding surfaces. Re-form the loops at the ends of springs (where
necessary) to ensure that they can not be accidentally dislodged
from their mountings. Wipe the springs with an oily rag to help
prevent rust.
Riveted levers and rollers. Cleaning is difficult where
levers and rollers are permanently riveted to a frame plate or another
lever, especially if the parts have a limited range of movement. Coat
the joint with light oil or solvent and work the parts vigorously,
applying pressure in all directions. You will see generally see black
oil or white powder gradually wash out from the pivot. Repeat until no
more dirt emerges, then leave it overnight. You will probably find it
sticky again in the morning. Repeat as necessary until the parts
remain free, then oil lightly and continue.
Screws and threads. Clean deposits from screw threads
with a fine wire brush, or a dental pick and toothbrush for fine
screws. Blackened screws can be refinished with "gun blue", taking
careful note of the safety instructions. Run a tap through threaded
holes to remove internal deposits if you have the correct size and
profile, otherwise clean them out with metho on a pipe cleaner.
Synthetic materials. Pay careful attention to any parts
made from synthetic materials, especially nylon and polyurethane.
These materials change with time, and may eventually leave a machine
not just inoperable but unrepairable.
 Nylon and similar plastics were used for gears, cams, and dials in some
late-model calculators, but trouble arises as the nylon shrinks with
age. Dials intended to turn freely can sieze onto their shafts and
prevent the machine from operating. If the parts can be removed without
further damage they can usually be drilled or reamed out to restore the
clearance. Components that were tightly attached to a shaft (or moulded
in place) can present a more serious problem, as shrinkage may cause
them to split and become loose or mis-aligned. The illustration shows
a typical shrinkage failure on a camshaft from a
Contex 10-key machine. This
problem is often fatal, especially when it occurs with complex moulded
components.
Nylon and similar plastics were used for gears, cams, and dials in some
late-model calculators, but trouble arises as the nylon shrinks with
age. Dials intended to turn freely can sieze onto their shafts and
prevent the machine from operating. If the parts can be removed without
further damage they can usually be drilled or reamed out to restore the
clearance. Components that were tightly attached to a shaft (or moulded
in place) can present a more serious problem, as shrinkage may cause
them to split and become loose or mis-aligned. The illustration shows
a typical shrinkage failure on a camshaft from a
Contex 10-key machine. This
problem is often fatal, especially when it occurs with complex moulded
components.
Polyurethane was widely used in the 1960s and 70s as a substitute
for rubber in belts, buffers, and cabinet feet. It de-polymerises
naturally over a period of 20 or 30 years to form either a dry powder
or an oily mess. Polyurethane drive belts have usually disintegrated
into powder or a tangle of sticky threads, as in
this example from a
Diehl Transmatic S.
Replacements for standard
XL or MXL belt profiles are generally available, but many machines
used custom profiles. Polyurethane foam used as sound deadening
material on the insides of cabinets has usually turned brittle, and
is best removed before it decomposes further. Replacements for simple
parts can sometimes be made from neoprene rubber.
Electrical equipment. Even the youngest motorised
calculator is now 50 years old, and many are over 100. Motor-driven
machines must be checked carefully and cleared of electrical
safety hazards before being connected to power. You wouldn't
drive an ancient "barn-find" car without checking the brakes, so
don't take the same risks with your calculator.
Most early calculators have "universal" (brush type) motors
with exposed live parts around the speed governor and switches. In one
popular machine the governor is arranged to throw carbon dust onto the
mains inlet socket, leading eventually to electrical arcing and fire.
Motor switches with exposed live parts are often buried in amongst the
mechanism and present hidden electrocution hazards. Many machines have
power cords and internal wiring insulated with rubber, which has
perished and become brittle with age. Very few machines have On/Off
switches or fuses, and can only be isolated by physical disconnection
from the supply. Many have no ground connections, leading to electric
shock hazards if any of the insulation fails.
Motor-driven machines always have additional components to supress
radiated electrical interference. These may vary from a single
capacitor to elaborate networks of custom-made capacitors, resistors,
and inductors. Capacitors from 50 years ago were insulated with paper,
which absorbs moisture when left idle for long periods. When energised
again the moisture will be heated and the capacitor will explode,
often causing the resistors and wiring to burn out as well.
Correcting all of these hazards is vitally important and requires
more than just basic electrical knowledge. Unless you are thoroughly
familiar with electrical wiring and safety requirements, or can obtain
help from an experienced person, it would be best to try to get the
machine checked and re-wired by a competent electrical workshop. In
many cases the problems of exposed live parts (eg around switches and
motor governors) are insurmountable, so that extreme care must
be taken when testing and adjusting with the covers removed. If all
else fails, keep your motorised machines as static exhibits and confine
your mechanical restorations to hand-cranked calculators.
Casework and keys
Keytops. The keys (or keyboard modules) should be washed
out to remove loose oil, then scrubbed with an ammoniated household
cleaner to remove the accumulated finger grease and discolouration.
(Clock cleaning solution is far too strong to use on plastic keytops).
A rub over with automotive polish will improve their appearance. On
single-moulded keytops it may be necessary to re-fill the numerals
with black or white acrylic timber putty or a slow-drying oil-based
paint.
Linings. Calculator casings are usually lined with
material to absorb sound, and the bases with material to absorb oil.
Many types of natural and synthetic materials have been used, including
pitch, felt, fibre, cardboard, linoleum, lead sheet, or polyurethane
foam. Cardboard and linoleum tend to curl inwards with age and may foul
on the mechanism. Adhesives may fail, especially if affected by oil,
leaving the linings loose inside the case. Plastic foam turns sticky
or degenerates into powder, and is best removed entirely before it
causes trouble. The base linings of older (pre-1930s) machines are
sometimes smelly due to the decay of poor-quality animal-based oils.
Remove or replace any lining material that is in poor condition.
Casings. Wash the casings thoroughly with soap and water
or mild household cleaners. Be careful to keep the surfaces uniformly
wet, especially with matte-finish paints. Severe streaking can result
if detergents are allowed to run or surfaces to dry unevenly. Polish
bakelite or gloss painted surfaces with a simple (non-silicone)
automotive polish. Cut replacements for scratched or discoloured
register windows from recycled clear plastic packaging or thin
acrylic sheet.
Rubber parts. Rubber and polyurethane parts will often be
in poor condition, especially if they have been in contact with oil.
While direct replacements are rarely available, suitable alternatives
can sometimes be found among the many types of feet, grommets, and such
like at a rubber parts store. Replacements for many simple parts
(eg Odhner pinwheel feet) can be cut from 3mm neoprene sheet.
Neoprene requires special adhesives if it is to be glued in place.
Elastomeric materials such as thermoplastic polyurethane (TPU) are now
available to allow reproduction of custom mouldings by 3-D printing.
Repairing
As you clean and check the parts, examine them closely for signs
of wear or damage. It is unusual to find parts which are actually
broken. Damaged or badly worn parts are rare in hand-cranked machines,
but are more common in motor-driven and automatic machines which have
been subjected to much heavier use. In deciding how far you should
go with repairs and replacements, you will need to consider:
- the future use of the machine
- the (un)availability of spare parts
- the capabilities of your home workshop
- the cost of professional assistance.
Unlike a vintage clock, a vintage calculator is probably not going
to be expected to run 24 hours a day. Worn parts can generally be
returned to service in a machine that is only required for light use
and occasional demonstrations. It may sometimes be possible to move a
worn part (eg the first register dial or carry lever) to a location
where it will be receive less use. Severely worn parts can often be
tolerated provided there is no chance of jamming or mis-operation.
Some calculator parts are case-hardened and will wear rapidly once the
hardening is damaged, but even this may be acceptable with only
light use. The only area in which compromise is not acceptable is in
the electrical equipment, which must be brought up to the highest
possible standard.
Parts which are broken or worn to the extent that they no longer
operate reliably can present a problem, as original replacement parts
are no longer available. Some calculator collectors have sacrificial
machines which can be "cannibalised" for replacements, or you may be
able to find a suitable "parts" machine at an auction or flea market.
If your machine turns out to need extensive repairs or replacements, it
may be easier to use it as the "parts" machine and to look for a better
one to rebuild.
 If replacements can not be found, it may be necessary to learn some
new skills, invest in some new workshop equipment, or seek professional
assistance. Many simple repairs are well within the capabilities of the
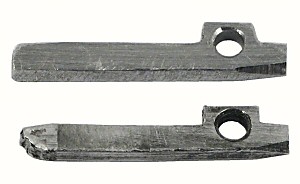
amateur workshop. The illustration shows a home-made replacement for a
damaged carry actuating pin from a 90-year-old pinwheel calculator. The
new pin (top) measures only 1.4 x 1.7 x 15mm, and was made in an hour
with nothing more than a selection of files. (Removing and re-fitting
the pin, however, took most of an afternoon). More complex tasks such
as re-bushing bearings and pivots, brazing broken levers, repairing
stripped screw holes, or replacing broken teeth on gears are generally
best left to the experts. A skilled machinist or clockmaker can repair
or re-manufacture most mechanical parts, but until calculators become
as valuable and as much appreciated as clocks, the cost of such
assistance will generally be far more than the machine is worth.
If replacements can not be found, it may be necessary to learn some
new skills, invest in some new workshop equipment, or seek professional
assistance. Many simple repairs are well within the capabilities of the
amateur workshop. The illustration shows a home-made replacement for a
damaged carry actuating pin from a 90-year-old pinwheel calculator. The
new pin (top) measures only 1.4 x 1.7 x 15mm, and was made in an hour
with nothing more than a selection of files. (Removing and re-fitting
the pin, however, took most of an afternoon). More complex tasks such
as re-bushing bearings and pivots, brazing broken levers, repairing
stripped screw holes, or replacing broken teeth on gears are generally
best left to the experts. A skilled machinist or clockmaker can repair
or re-manufacture most mechanical parts, but until calculators become
as valuable and as much appreciated as clocks, the cost of such
assistance will generally be far more than the machine is worth.
Reassembly
Order of assembly
While it is generally possible to reassemble a machine by exactly
reversing the order of disassembly, this is rarely the best or most
efficient method. While you were taking the machine apart, you would
surely have noticed things that could have been done better in a
different order. Before starting reassembly in earnest, it helps to
make a number of trial assemblies to see which is the easiest and most
efficient method. These may involve finding the best sequence to
assemble a small group of levers, or larger experiments to find whether
(eg) the back or the sides should be installed first. It will probably
be necessary to back-track many times, so don't bother with fasteners
or lubrication at this stage.
As you experiment with the trial assemblies, try to imagine how the
job might have been done in the factory. Look for groups of parts that
can be pre-assembled into modules or sub-assemblies, and for ways in
which they can be tested before installation into the machine. If a
task seems to require three hands, think about what jigs or special
tools might have been used to assist, and whether it might be worth
making something similar. A lot of tedious operations can be made much
easier by fashioning a simple tool or fixture from a piece of wood or
wire, or by doing things in a slightly different order.
Revising notes
Once you have cleaned and checked all your parts and decided on the
order of assembly, the actual process will usally go fairly smoothly.
Refer constantly to your original notes and sketches, and make any
additions or revisions that are necessary. At the same time, make a
new set of brief notes to record the actual sequence of steps as you
proceed with reassembly. Keep the notes when you have finished in case
the machine needs attention in the future, or write them up and
publish them for the benefit of others.
You may find areas where your original notes prove to be
insufficient for reassembly, and you will need to revert to "first
principles" in order to proceed. Study the parts in the group in
question, their relationships to their neighbours, and what they are
meant to achieve. Every part is there for a reason and has a specific
function to perform. Once you understand its purpose, its alignment or
timing requirements will become clear. Solving these little puzzles
is made much easier if you keep the groups small on disassembly.
Lubrication
Most of the problems in a vintage calculator are caused by the
decay of the lubricating oil, so the choice of the new lubricants is
clearly an important decision.
In ancient times most lubricants were derived from vegetables (olive
oil, rapeseed oil, etc), or animals (lard, neatsfoot oil, whale oil,
etc). Use of these natural products continued right through the
industrial revolution and on into the 1920s, until quite rapidly
displaced by petroleum-based "mineral oils" with the coming of the
automotive age. It is interesting to note that whale oil continued to
be used for its non-gumming properties in vehicle automatic
transmissions until whaling was banned by most countries in the 1970s.
Since then the focus has moved from refining existing materials to
creating new ones through molecular engineering, thus producing a range
of modern "fully-synthetic" oils with made-to-order properties.
- Natural oils. Of the original natural oils, pure Neatsfoot
oil is still available as a by-product of the livestock industry. It is
used mainly as a leather dressing, and is readily available in domestic
quantities from rural or equestrian suppliers. The natural oils used by
some clockmakers (eg Windles, Moebius) are available from trade
suppliers, but even clockmakers have their disagreements about suitable
lubricants. The interior of a hundred-year-old machine that has been
lubricated only with natural oils will generally be coated fairly
evenly with a thin film of blackened oil. This residue is no longer
liquid but has not hardened, and most parts will move freely without
sticking or gumming. Natural oils may not be top-class lubricants by
modern standards, but they are entirely satisfactory in a calculator
that will only be used for occasional demonstrations.
- Mineral oils were used almost exclusively in mechanical
calculators from the 1920s until the end of production around 1970.
Specific lubricants are sometimes mentioned in the original service
manuals, but most of those are no longer manufactured, or are only
available in industrial quantities. In any case, those are the oils
that have caused the present troubles, so they can not be recommended
to be used again. Of the readily-available "domestic" oils, I have had
good long-term results with "Singer" sewing machine oil, but I have
used other (apparently similar) "handy oils" that have gummed a machine
in less than a year. Modern mineral oils with a high proportion of
unknown additives (eg 3-in-1 or WD-40) are widely available, but the
general consensus is that they are probably best avoided in calculating
machines. Heavy automotive oils and greases lead rapidly to stiff and
sticky operation and should not be used.
- Fully-synthetic oils have been available since the 1970s, and
the modern versions are extremely capable lubricants for their intended
applications. Whether this includes vintage calculators remains to
be seen. Some clock restorers have reported good results from "Mobil 1"
engine oil. Model train enthusiasts often use the fully-synthetic
lubricants sold in small quantities from hobby shops under the "Labelle"
brand. I have not extensively tested either of these oils.
When re-lubricating a still-working calculator or undertaking minor
repairs I try to use the same type of oil that was used originally:
natural oils for pre-1920s machines, and mineral oil thereafter. When
rebuilding a machine from a set of fully cleaned parts I generally use
pure Neatsfoot (natural) oil on hand-cranked machines and Singer (light
mineral) oil on the motorised varieties. During assembly I apply a thin
film of the same oil to all steel parts (and especially springs) with
an oily rag to help prevent rust. I apply oil to bearings and pivots
with a wire or needle, and to gears with a small brush.
Calculator service manuals generally advise to lubricate sparingly
and to guard against over-oiling. Some parts are designed to operate
without oil; for example, die-cast pinwheels sometimes contain a high
percentage of lead, which acts as a natural lubricant. Very small parts
may be better left without oil if there is a chance that it would slow
their movements.
I have had no problems with calculator lubrication since I stopped
using automotive oils and greases about 30 years ago. I would be
interested to receive any feedback on this topic, or comments on your
experiences.
Checking and testing
As you assemble each group of parts, check constantly to ensure that
everything engages properly and moves freely. If anything becomes stiff
or sticky or fouls against its neighbours, it must be corrected before
proceeding. It is best to find these problems as soon as they arise,
rather than after they are buried deep inside the machine.
Functional checks of each of the "simple machines" should be made as
soon as practical. Sometimes it may be helpful to temporarily install
a missing part, or simulate its operation, rather than waiting until it
is permanently installed much later. Adjustable components can often
be set more easily when the machine is only partially assembled.
When the machine is fully assembled, the calculating mechanism must
be tested thoroughly. The most important things to check are the
operation of the basic addition and tens-carry mechanisms, the clearing
controls, and the multiplication and division controls on automatic
machines. Service manuals often contained long schedules of test
calculations that were designed to exercise every function of the
machine. These were used in the workshops after any repairs or
adjustments, and sometimes to demonstrate the correct operation of
the machine to the customer. In the absence of the factory schedules,
the following minimum tests are suggested:
- Check the basic add/carry mechanism by adding 123456789 ten times
and checking that the result is 1234567890. Repeat for 987654321.
Repeat for subtraction.
- Check the ripple carries (and the "fugitive one" mechanism on
printing calculators) by clearing the machine and subtracting 1. Verify
that the ripple carry proceeds smoothly across the whole accumulator
(or as far as the carry mechanism extends). Add 2, and check that the
result is +1.
- On automatic machines, multiply 2 by 2 in each position of the
keyboard (ie, 2x2, 20x20, 200x200, etc) and check the results in the
accumulator and counter. Shift the carriage to ensure that all
accumulator positions are tested. Repeat for divisions.
If the machine passes these checks, you can have a fair degree of
confidence that the calculating mechanism is operating correctly. You
should then proceed to check all of the other functions of the machine.
On-going maintenance
After you have completed your overhaul and explored the capabilities
of your machine, do not just put it back on the shelf and forget about
it. A little on-going maintenance is always necessary to keep any
machine in good condition.
It was well known in "the old days" that a machine which had sat
idle for 12 months or more would not operate as quickly or smoothly as
intended, and would need to be washed out and re-lubricated before
being returned to service. It is therefore important to exercise your
calculator regularly, in all of its functions, to keep the lubricants
moving and prevent them from hardening in place. Periodic application
of new oil to bearings and pivots will keep the lubricants in good
condition, and will help to wash out any accumulating dirt and decay
products. So long as the lubricants remain liquid, the need for
another major overhaul can be postponed indefinitely.
Original text and images Copyright © John Wolff 2008-2022.
Last Updated: 4 September 2022 - expanded cleaning and lubrication sections.
Back to:
Home
Calculating Machines
Tech Index